Setting Up
This page provides a comprehensive guide on setting up your clock after powering it up. You’ll learn how to connect to WiFi, use the clock’s webpage for customization, and adjust color, brightness, time settings, and more.
The design of this clock allows it to function independently, eliminating the need for downloading an app or creating an account on unfamiliar platforms. However, to configure the device and access features like obtaining the current time, selecting colors, and making customizations, it is necessary to connect to WiFi.
Connecting to the Wifi
To begin the setup process, open your device’s WiFi settings and locate the network named word-clock-one-xxxxxx (where xxxxxx corresponds to the unique ID of your clock). Connect to this network to establish a direct connection between your device and the clock, enabling further configuration.
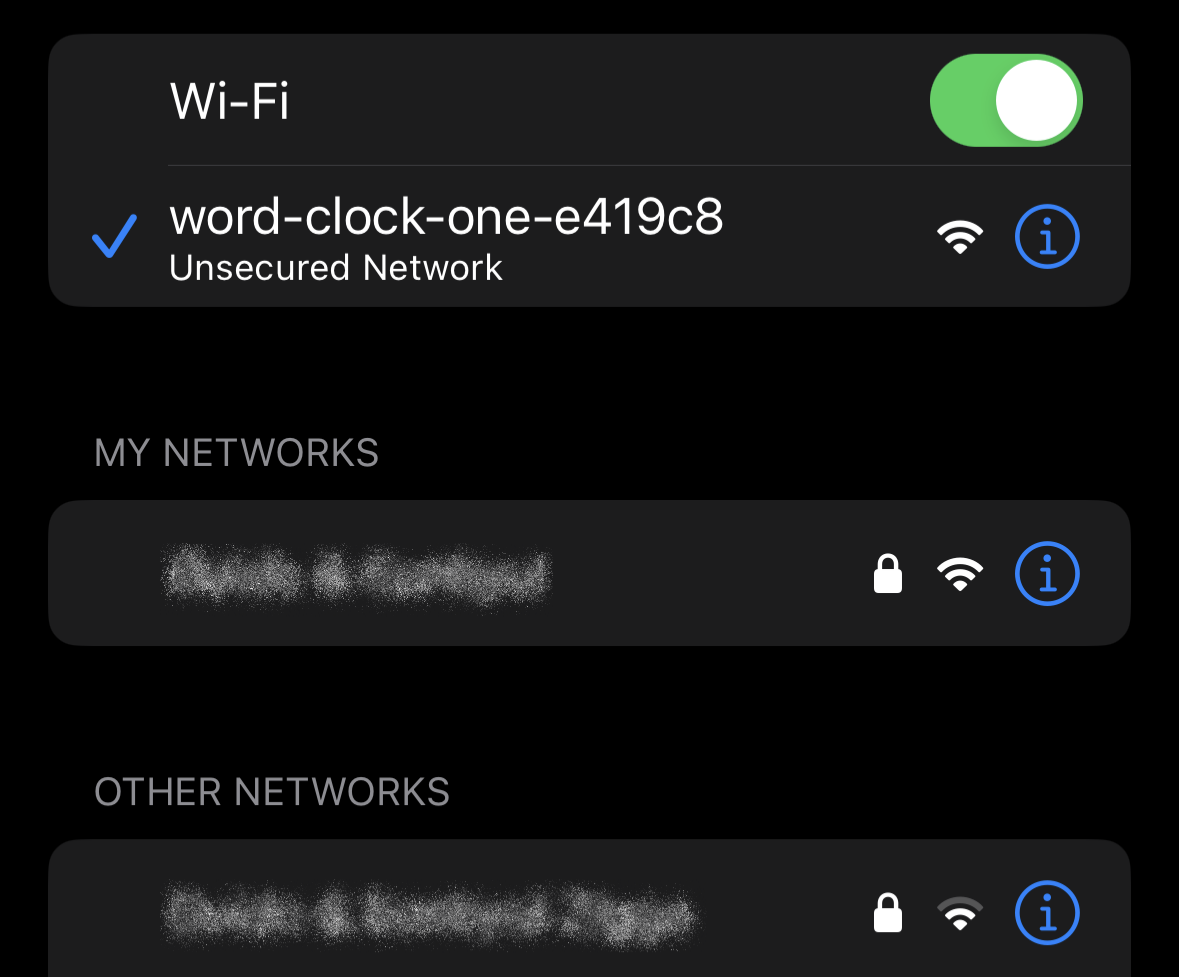
Once you have connected to the word-clock-one-xxxxxx network, a popup should appear, allowing you to enter your WiFi credentials. This step enables the clock to connect to your personal WiFi network. From there, you can provide your WiFi credentials and establish the connection between the clock and your WiFi network.

Once the clock has successfully connected to the internet, the current time should automatically appear within approximately 30 seconds.
If the popup does not appear automatically, you can manually browse to the IP address 192.168.4.1 in your web browser to access the configuration page.
Make sure to remember the unique ID (xxxxxx) of your clock, which is the same as the word-clock-one-xxxxxx network name, for the next step in the setup process.
Webpage
Now that your clock is connected to WiFi, you can access the webpage to customize various settings such as color, brightness, and time adjustments. To access the webpage, simply navigate to either word-clock-one-xxxxxx.local (where xxxxxx corresponds to the unique ID of your clock) or use the IP address associated with your clock. From there, you’ll have full control over personalizing your clock’s settings to suit your preferences.
Please note that you can find the unique ID written on the backside of the clock, or you may have already remembered it from the previous step.
In certain cases, accessing the webpage via word-clock-one-xxxxxx.local may not be possible due to your router’s settings. If this occurs, you will need to access the webpage by entering the IP address instead. You can find this address on your router’s configuration or use network scanning tools like Fing to discover the IP address assigned to your clock.
To ensure optimal functionality, it is recommended to use a device with a sufficiently large screen, such as a laptop, when accessing the clock’s webpage.
Selecting the Color
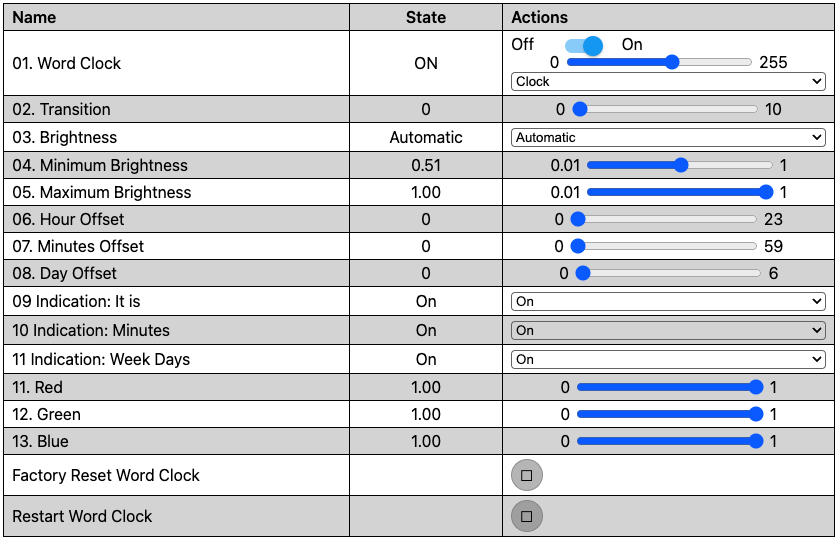
To select the desired LED color for your clock, simply use the sliders labeled 11. Red, 12. Green, and 13. Blue. These sliders allow you to customize the color to your liking by adjusting the intensity of each color component.

Please note that the red, green, and blue values control the color of the light emitted by the clock, not its brightness. These values allow you to fine-tune the color combination for a personalized display. To adjust the brightness of the clock, please refer to next section.
When you connect your clock to Home Assistant, the color settings are configured using the option labeled 01. Word Clock instead of the individual red, green, and blue sliders. By accessing the 01. Word Clock setting, you can conveniently adjust the color scheme to your liking within the Home Assistant interface.
If you prefer a warm white color for your clock display, we recommend using the following color settings; Red 1.00, Green 0.63 and Blue 0.25.
Brightness Control
To control the brightness of your clock, you have two options available. The first option is the automatic mode, where the clock’s brightness adjusts automatically based on the ambient light intensity in the room. This ensures optimal visibility and comfort in different lighting conditions.
Alternatively, you can switch to manual mode, allowing you to manually select and fix the desired brightness level. In this mode, the brightness setting remains constant regardless of any changes in the ambient light intensity.
Automatic Mode
To use the automatic brightness control feature, follow these steps:
- Ensure that the
Automaticoption is selected under the03. Brightnesssetting. - Place the clock in a well-lit room and use the slider labeled
05. Maximum Brightnessto set your desired brightness level for brighter environments. - Next, place the clock in a dark room and use the slider labeled
04. Minimum Brightnessto set your desired brightness level for darker environments.

Once these settings are configured, the clock will automatically adjust its brightness based on the ambient light intensity in the room.
Please be aware that if you have selected a very low value for 04. Minimum Brightness or if you have chosen this value in a brightly lit room, the clock may appear to be turned off or extremely dim. In such cases, it is recommended to adjust the brightness setting accordingly by increasing the value for 04. Minimum Brightness.
Manual Mode
To set a fixed brightness for your clock, follow these steps:
- Select the
Manualoption under the03. Brightnesssetting. - Use the slider labeled
01. Word Clockto adjust and set the desired brightness level.

By choosing the manual mode and adjusting the brightness using the 01. Word Clock slider, you can establish a fixed brightness that remains constant regardless of the ambient light intensity.
Adjust Time
Upon connecting, the clock automatically sets the time based on the time settings of your router, including the time, time zone, and any adjustments for winter or summer time. However, if you find that the time is incorrect for any reason, you can manually adjust it using the sliders labeled 06. Hour Offset and 07. Minutes Offset. These sliders allow you to add the correct number of hours and minutes to align the clock with the accurate time.

Transition
When the time changes, you have the option to make the words on the clock change instantly or gradually fade out the old time and fade in the new time. This can be selected using the transition slider labeled 02. Transition. The transition slider allows you to choose any value between 0 and 10. A transition setting of 0 corresponds to an instant change, while a setting of 10 means it takes 10 seconds to transition from the old time to the new time.

Customizing
You have the flexibility to turn on or off different parts of the clock, such as the “it is” indication, minutes indication, and week days indication. This can be achieved through the respective options: 08 Indication: It is, 09 Indication: Minutes and 10 Indication: Week Days By toggling these options, you can customize the display of the clock to show or hide the specific parts.
